|
|
|
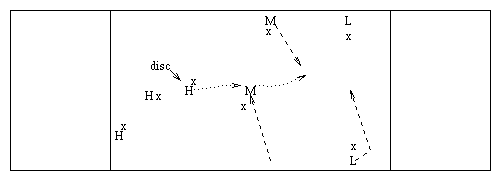
The Spread Offense is a conundrum: it is the simplest of schemes, and
yet is the most counter intuitive. Veteran players have the most
difficulty learning it because they essentially are genetically
programmed to stack. The Spread does not use a stack at all. The
middle of the field is left open to be used by the Handlers (H), or one
of the Middles (M) or Longs (L) at a time (see figure).
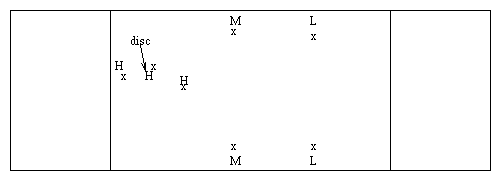
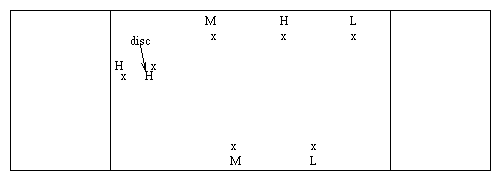
Two or 3 Handlers may be used (3 are shown in the diagram
above). Using 2 Handlers allows a 3rd Handler to occupy a Middle
position, thus increasing the chances for completed passes as the play
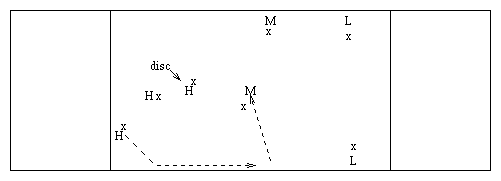
progresses upfield. When 2 Handlers are used,
a 2nd Long sets up on the sideline further upfield (see figure below).
Using 3 Handlers often will allow the first pass to be longer should the Pull be one that quickly covers the length of the field; the remaining two Handlers can then set up a little further upfield in such a case. A strategy which would accomplish this while, at the same time, allow the 3rd Handler to occupy a Middle position is to have a weaker thrower take the Pull, and make the first pass. This strategy might backfire if the Pull goes out of bounds, or if it hangs in the air, and allows the defense to mark up (if that occurs, the weaker thrower can be sent upfield).
The Spread Offense has the following objectives:
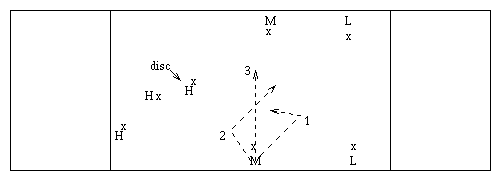
The real benefit of the Spread lies in having the disc within
20-25 yards of the endzone. If a Long's defender looks for the
disc, the Long can head to the endzone. If a Long's defender looks
only at his/her mark, one fake should make for an easy pass to that
Long (see figure). Yep, it's the Endzone Play
being run at an angle.
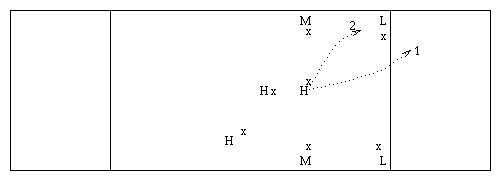
Keep in mind, there are no other defenders to help out against either the right Long or left Long in the endzone. It's basically 2 on 2 by the time it gets to that point, and the advantage is heavily in favor of the offense then. When in doubt, run the Endzone Play.
The simplest play that takes advantage of the open field is to have the Handlers Give & Go all the way to the endzone. This works especially well if there is a significant 2-person or 3-person mismatch. A fun example is for a team with strong women to Handle, and the men occupy the sidelines and stay out of the way. (In such a women-as-Handler situation, the typical pattern is that the Longs' defenders will want to poach to protect the endzone, leaving the Longs for open passes to either corner.)
The Gauntlet works because there is so much room for passes to be thrown and received. It's as if you were playing 2 on 2, or 3 on 3; there is nearly always a place into which to cut.
A Side Note on the Give & Go: if it breaks down, there are 3 ways to recover:
Following a pass to a Middle or Long, there are 2 options. If the
pass goes to a Middle on the sideline, the Handler can cut further
upfield for a return throw right back, thus continuing the Gauntlet
(see figure).
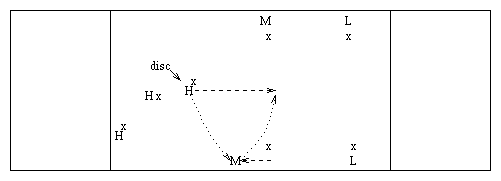
Or, if the Middle (or Long) received the pass in the middle of the
field, s/he may then look to throw to the other Middle or Long
(see figure).
A key point to remember is that the person with the disc (whether a Handler, Middle or Long) is responsible for determining who gets the disc next. If need be, the thrower should call out the next receiver, or call for the Iso ( Endzone) Play.
You will notice that as the disc progresses
upfield, the Middles and Longs will maintain their relative position
to the disc by sliding up the field toward the endzone. Only one of
them, however, will actually enter the endzone (the other players
position themselves on the goal line, on the sideline). If a Middle
takes a pass from a Handler (or the other Middle), a Handler will take
that Middle's vacated place on the sideline (see figure).
One of the main benefits of the Spread is to have a featured player who is a Middle or Long. Usually, this person is someone who has a mismatch, whether it be speed, height or savvy. Or, the Featured Player may simply be someone who hasn't touched the disc in a while.
Once the Handlers move the disc upfield a ways, a Handler can then look for the Featured Player to cut; the other Middles and Longs stay on the sideline. The Featured Player can:
After the Featured Player receives the pass, s/he simply turns and looks for a Middle or Long for the next cut (keep in mind that the thrower of the pass hangs back, probably to become the Dump). There is no hurry; none. The isolated defenders are in trouble. Only a bad throw (e.g., hanging the disc up) or a cut that is broken off will cause a problem.
Voila! You have just taken the Spread Offense course 101. It's up to you now to make it work, and to create your own plays and variations on this theme.